
How to Take a Professional Headshot: A Step-by-Step Guide
Learn about your options and how to take a professional headshot with clear, step-by-step tips on lighting, framing, posing, and background selection.

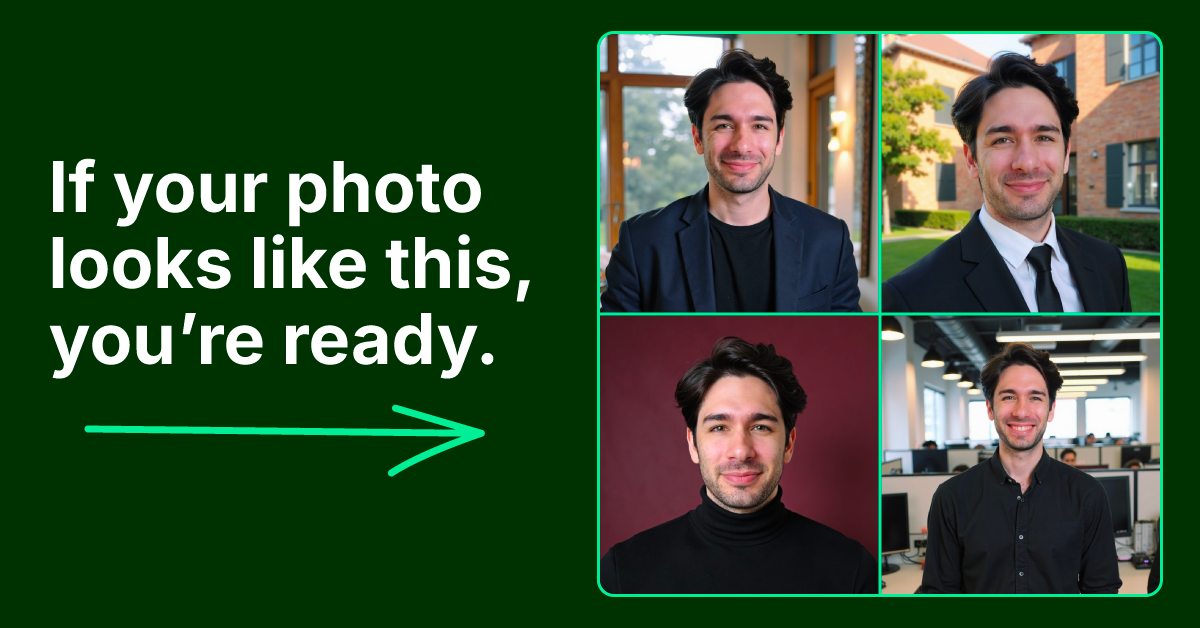
Skip the expensive photoshoot. Here’s how to take a clean, credible headshot using just your phone and a few posing tips.

You need a professional headshot but don’t have a fancy camera, studio lighting, or time to spend posing for a professional photographer. Maybe you’ve cropped a vacation photo, used an old LinkedIn profile pic, or skipped the headshot entirely, hoping your credentials would speak louder.
But here’s the truth: Potential clients and recruiters judge your professionalism before reading a single line on your resume or bio. If your photo looks dated, blurry, or overly casual, you risk being overlooked.
The good news? You don’t need a studio to look polished. With just a smartphone and a few smart moves, you can capture high-quality business headshots that make you look credible, trustworthy, and ready for serious opportunities.
Whether you're a lawyer, founder, coach, or job seeker, here’s how to take a DIY headshot that works as hard as you do.
TL;DR: You don’t need a DSLR, studio lights, or a $500 headshot session to get a photo that opens doors. With just your smartphone and a few strategic moves, you can capture a clean, confident profile photo that works across LinkedIn, resumes, bios, and personal brand sites. This guide walks you through everything—outfits, good lighting, framing, posture, and common pitfalls—then shows you how to elevate your best shot into a polished, studio-quality image. If you're tired of awkward selfies, outdated pics, or if a photo “looks professional,” InstaHeadshots helps you skip the guesswork and get results that look sharp, credible, and real.
Step 1: Decide where you’ll use your headshot

Before you think about lighting or what to wear, get clear on one thing: where will your headshot photo live, and what do you want it to say about you?
A great headshot for LinkedIn may not be the right one for a personal website, pitch deck, or press kit. Corporate headshots build trust in legal or finance roles. Friendly, relaxed portraits work better for coaches, realtors, and wellness pros. Creative industries? They often call for something more modern, expressive, even a little bold.
Ask yourself:
- Is this the first image recruiters will see on LinkedIn, or the face of your brand on a personal site?
- Do you need to look polished and authoritative, or warm and approachable?
- Will clients expect clean and corporate, or confident with a creative edge?
Clarifying this upfront shapes every decision that follows, including your outfit, background, and the expression you wear for a good headshot.
Step 2: Choose your outfit

For professional headshots, the advice to “wear what makes you feel comfortable” doesn’t always apply. A stretched-out hoodie or busy floral blouse might feel like home, but in a professional headshot photo, they may come across as careless or distracting.
Here’s how to dress to match your role:
- Solid colors: Patterns and stripes pull focus away from you. Stick to clean, neutral tones like navy, soft blue, olive, charcoal, and taupe.
- No logos or graphics: Branding belongs in your portfolio, not across your chest.
- Avoid stark white or deep black: They often throw off lighting and create harsh contrast. Mid-tones and soft textures photograph best.
- Match the tone to your industry: A blazer or blouse works well for corporate roles, a tailored casual outfit is great for tech roles, and a relaxed yet polished style is ideal for coaching or creative roles.
The right outfit signals confidence, clarity, and professionalism, without stealing attention from your face. That’s what earns you a pause and second look from a hiring manager or investor.
Step 3: Find the best lighting

Lighting can make or break your professional photo. You can wear the perfect outfit and strike the right pose, but if your light source is harsh, dim, or uneven, your photo will fall flat.
Here’s what works: Stand facing a large window with soft, natural light. That glow will even out your skin tone, highlight your features, and add clarity without washing you out.
Avoid these common lighting faux pas:
- Direct sunlight: Creates shiny spots, harsh shadows, and squinty eyes
- Overhead lights: Cast unflattering shadows under your eyes and nose
- Window blinds or filtered light: Leave distracting lines and uneven tones across your face
Pro tip: Shoot in the morning or late afternoon when the light is softer and warmer. That “golden hour” glow is flattering for every skin tone and doesn’t require a single filter or Photoshop tweak.
Step 4: Set up a simple background

A distraction-free background keeps the focus where it belongs—on your face. This isn’t the time for busy bookshelves, loud wallpaper, or a peek into your laundry pile.
Your best bet? A clean, neutral wall in soft gray, cream, or beige. Even a lightly textured white background can work—just avoid anything that competes with your expression or makes the shot feel cluttered.
Follow these background rules that most people miss:
- Stand 2–3 feet away from the wall. It helps prevent harsh shadows and adds subtle depth to your shot.
- Avoid mirrors, windows, and wall art. They reflect light or shift focus where it doesn’t belong.
- Skip the quirky decor or busy wallpaper unless it deliberately supports your brand.
Your background should feel intentional, not accidental. Keep it simple, clean, and quietly professional.
Step 5: Frame the shot correctly

You don’t need a photography degree to frame a solid headshot. Balance, clarity, and a few smart adjustments are what you need.
Capture yourself from mid-chest up, with your face centered and your camera level: no weird angles, towering forehead crops, or “selfie arm”.
Here’s how to nail the framing:
- Leave a bit of space above your head. It gives the image room to breathe and avoids a cramped feeling.
- Center your face. Not slightly off. Not artistically diagonal. Just clean, focused, and direct.
- Keep the camera at eye level. Tilting up or down distorts your features, creates a double chin, and makes the shot feel amateurish.
A well-balanced shot signals confidence, competence, and attention to detail, the qualities that make you appear worth taking seriously.
Step 6: Practice your expression and posture
Your headshot should look like you on your best day. That doesn’t mean stiff suits and forced smiles. It means showing up as someone who’s confident, composed, and trustworthy.
Stiff posture and flat expressions signal nerves or inexperience. And exaggerated grins or over-rehearsed “camera faces” can come off as insincere. The goal is to look naturally confident and relaxed without trying too hard in front of the camera.
Follow these simple but effective cues:
- Drop your shoulders: Tension shows in photos, so relax your frame.
- Straighten your back: Good posture reads as poise, not rigidity.
- Look directly into the camera: Eye contact builds trust and fosters connection.
- Keep your expression natural: A soft smile or focused gaze goes further than a forced grin.
Perfect the posture and expression, and the photo speaks before you ever say a word.
Step 7: Take multiple photos from slightly different angles
Your first snap may not always be the strongest. Give yourself room to find the best version of yourself. Tiny changes in posture, angle, or distance can completely shift how your headshot appears. And what looks good in the moment might feel off once you review it later with fresh eyes.
Follow these tips to build a solid batch of photos:
- Try subtle head tilts and shifts in posture: A 5- to 10-degree tilt can sharpen your jawline or soften your gaze.
- Change your angle slightly: Try straight on, then slightly turned. See what feels most natural.
- Step a bit closer, then back away: Find the frame that flatters you best.
- Use a tripod or a steady surface: It keeps your framing consistent and frees up your hands to focus on posture and expression.
Think of this as a quick headshot session, rather than a one-and-done selfie. Trying different poses gives you more control and more options.
Step 8: Review and select your best shot

Once you’ve taken your photos, step away for a bit to give your brain a break. You’ll spot the winners faster when you return with fresh eyes.
Remember: You’re not just looking for the most polished shot. You’re looking for the one that feels natural, professional, confident, and unmistakably you.
Follow these final checks:
- Does it feel natural? Not stiff or overly posed—just real and composed.
- Is the lighting even? No harsh shadows, shiny spots, or blown-out highlights.
- Are your eyes sharp and in focus? That’s where trust and connection land.
- Is the framing clean and balanced? No awkward cropping or slanted angles.
If nothing quite clicks, no problem. Use what worked and do another quick round. You’re close, and now you know what to adjust.
Step 9: Use InstaHeadshots to elevate your final result
You’ve got a strong base photo; now take it from solid to standout. InstaHeadshots is one of the best AI headshot generators, transforming a well-lit smartphone snap into a polished, studio-quality photo in minutes. No expensive gear, awkward headshot sessions, or photo editing skills required.
Just upload your best headshot, and our AI automatically enhances it—refining the lighting, sharpening your features, adjusting the framing, and swapping in a clean, professional background that suits your industry. Whether you're in finance, tech, coaching, or design, you can choose from a thousand different looks that match your role and tone, from polished corporate to modern creative.
It’s the easiest way to look like you just stepped out of a $500 studio session without spending more than 15 minutes or a fraction of the cost.
Don’t settle for a cropped vacation photo or waste hours trying to get it right. Try InstaHeadshots for free and get pro-quality headshots without the hassle of traditional headshot photography.
Step 10: Update your professional profiles with confidence
Now that you’ve captured a headshot you’re proud of, it’s time to put it to work. A strong headshot isn’t just a nice-to-have; it’s a tool that supports your goals, communicates your credibility, and helps you show up with intention across every platform that matters.
Start by updating your LinkedIn profile. Then refresh your resume, company bio, or personal site. Anywhere your name appears, your headshot should reinforce the impression you want to make: confident, professional, and ready for what’s next.
If you followed these steps—or used InstaHeadshots to polish up your new headshot—you’ve already done the hard part. No more guessing, cropping, or apologizing for outdated shots. You’ve got a clean, polished image that looks like you and aligns with the opportunities you’re chasing. That’s confidence, credibility, and clarity rolled into one frame.
Common mistakes to avoid
Even when you follow every best practice, small slip-ups can sneak in. It happens to everyone, and it doesn’t mean your effort was wasted. But these details can affect the polish and professionalism of your final headshot.
Here are a few easy-to-miss issues we see all the time:
- Cropping too tight (or not enough): Framing can feel fine in the moment, but it can later reveal awkward headroom or cut off shoulders. InstaHeadshots automatically reframes your image to keep proportions clean and balanced.
- Distracting backgrounds: A tidy room might still have outlets, clutter, or uneven shadows that distract once the photo is enlarged. Our technology replaces backgrounds with clean, industry-appropriate backdrops to eliminate visual noise.
- Lighting that tricks the eye: What looks soft in person can create harsh shadows or shiny spots on camera. InstaHeadshots adjusts the lighting tone and exposure for natural, even highlights every time.
- Expressions that don’t translate: You thought you looked relaxed, but the result appears stiff or strained. Our system selects subtle variations for your most natural look.
- Overediting with filters: It’s easy to go overboard with phone apps when editing a headshot, but too much smoothing or saturation can make the image look artificial. InstaHeadshots preserves natural skin tone and facial details, so you look like your real, professional self.
If your DIY professional headshots didn’t quite hit the mark, don’t worry—that’s what InstaHeadshots is here to fix.
Ready to look the part—without the guesswork?
Whether your DIY photo turned out great or just close enough, you now understand what makes an exceptional headshot. You’ve done the work, followed the steps, and taken control of how you show up professionally. But if you’re still second-guessing your final image, know that you don’t need to start over or settle for “good enough.”
InstaHeadshots was designed to help you turn a decent photo into a polished, professional headshot that works across every platform, from social media to pitch decks. No reshoots, filters, or Photoshop skills required.
You get fast, studio-quality results with realistic lighting, sharp details, and backgrounds that match your role and industry, delivered in 15 minutes.
Skip the trial and error. Try InstaHeadshots now and make a great first impression with credibility.
InstaHeadshots has delivered over 4,392,249+ stunning headshots for 50,000+ professionals
We want you to know that you are in good hands. Our only promise is to leave you impressed with your headshots and come out happy on the other side.
Create your Headshots Now