
Headshot Lighting Setup: How To Light Yourself Like a Pro
Get expert tips for the best headshot lighting setup. Learn how to use natural light or a simple at-home setup to look professional in any headshot.

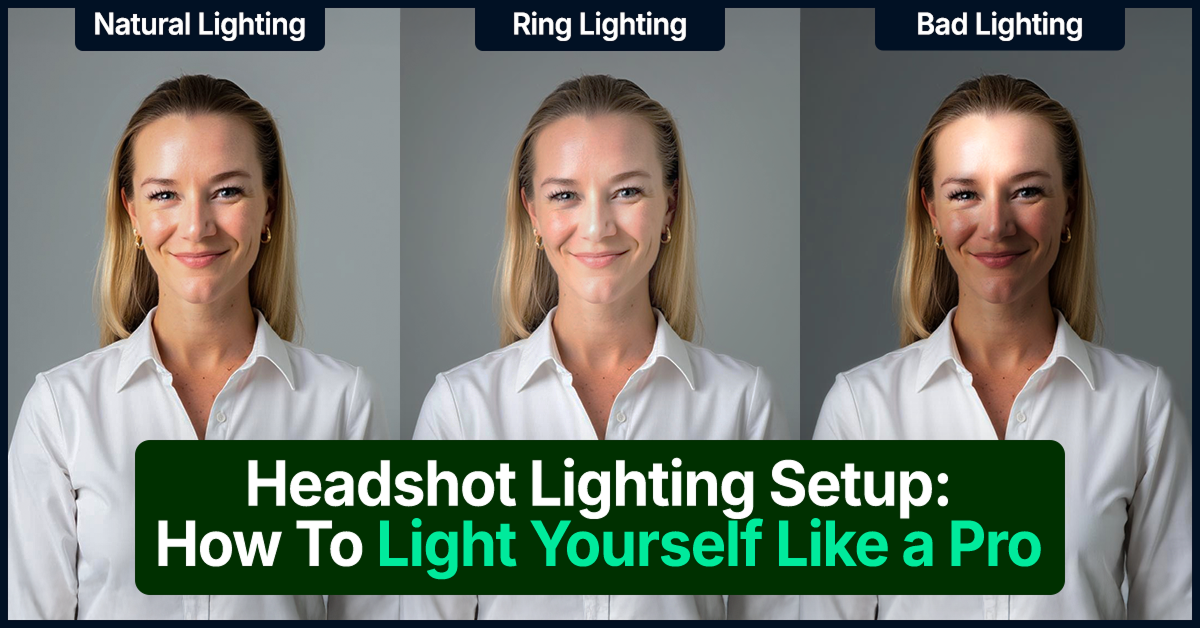
Look polished, professional, and camera-ready with these easy lighting tips.
Poor lighting can make or break a headshot, even if every other element of the photo is perfect. When the lighting is off, you end up with shadows or glares that detract from your face.
Of course, most people don’t have studio-quality lighting at home, and that’s okay! You can still DIY a flattering headshot with natural light or strategically placed lamps without even leaving your house.
Let’s look at some pro-level tips for perfect lighting—and how InstaHeadshots makes the process even easier by automatically generating headshots with flattering lighting patterns built in.
TL;DR:
Professional headshots often use two or more lights to create depth and balance. You can recreate these techniques at home by using natural light or placing ring lights or lamps at the correct angles. Or you can get perfectly lit AI headshots in just minutes with InstaHeadshots.
Why lighting matters in professional headshots
Professional headshot lighting captures your best features, so your headshot can create a lasting impression.
On professional platforms like LinkedIn, Slack, Behance, and Notion, your headshot is the first thing people see, and 70% of employers now use social media to screen job candidates. People form impressions on qualities like trust, professionalism, and approachability within seconds, and high-quality lighting helps you send the right message.
The right lighting technique creates depth and dimension in your photo, showcasing your unique facial features and impacting the mood of your headshot. Soft and diffused light gives a warm and homey feel, while high-contrast lighting has a dramatic and intense effect.
Whatever impression you want to make with your headshot, pro-level lighting is the foundation.
The fundamentals of good lighting
Professional headshot photography uses three lights: a key light, fill light, and backlight. Here’s how these three light sources work together.
- Key light: This is the main light source for a headshot. Photographers usually place the key light in front of the subject at a 45-degree angle, just above the subject’s eyes. This way, the light falls on the sides of the face to highlight the cheekbones and create depth instead of washing them out.
- Fill light: A fill light is a less intense second light placed opposite the key light to eliminate harsh shadows from the subject’s face, balance out the photo, and create a soft look.
- Backlight or rim light: A backlight, rim light, or hair light is placed behind the subject to add depth and contrast to the photo. It’s not mandatory, but this type of light helps keep the subject from blending into the background. It also highlights the texture of their hair and clothing to make the headshot look more realistic and dynamic.
While you don’t need all three of these light sources to get a high-quality professional headshot at home, it’s easy to DIY studio techniques with light sources you have on hand. Just a few tweaks can eliminate harsh shadows and contrasts for a softer look.
For example, you could also position yourself near a window instead of using a fill light, then place a regular lamp or desk light at a 45-degree angle from your face to replicate a studio setup.
Natural light vs. studio light: What’s best for headshots?
Not everyone has the time or money for a studio photography session. In many cases, shooting at home with natural light works just as well. Let’s compare the pros and cons of both options to decide what makes sense for your photoshoot.
Pros and cons of natural lighting
You can use natural light to create beautiful photos by shooting outdoors or next to a window to harness the natural glow of the sun. Here’s why this approach works well for DIY headshots:
- It’s free! With patience and good timing, even total beginners can use natural lighting to create beautiful headshots. You don’t need an expensive camera or a professional photographer to take advantage of natural light. You can even take the photos with your phone.
- It’s flattering. Natural light creates a soft glow around your face. It’s also a continuous light, so it’s easy to make real-time adjustments as you’re shooting rather than adjusting the setup each time.
- It feels authentic. Natural light gives your headshot a friendly and approachable vibe while still looking professional.
That said, there are some drawbacks to shooting in natural light:
- It’s unpredictable. When the weather changes, so does the light. You can get dramatically different results depending on when and where you shoot.
- You don’t have control. You’ll need to be patient and wait for the perfect soft glow with no harsh shadows (tips on this later!).
Pros and cons of studio lighting
If taking your own photos feels overwhelming or you don’t want to deal with creating an at-home setup, you can always hire a professional headshot photographer to take photos in a studio instead. Professionals use advanced techniques like clamshell lighting and softbox lighting for a polished look.
But before investing in a studio photoshoot, consider the pros and cons. Here are some of the advantages of studio lighting:
- It’s professional. Your photographer will use pro equipment and bring plenty of experience to the table. You don’t have to worry about managing the lighting on your own.
- It’s tailored to you. Since the photographer has total control over the lighting setup, they can adjust it to reflect your needs and stylistic preferences, whether that’s a sharp, professional look or something more creative.
Still, there are plenty of reasons why studio lighting isn’t the best option for everyone:
- It can feel unnatural. Studio lighting might feel too intense if you just need a simple, straightforward headshot. Some people also feel awkward posing for professional headshots.
- It’s pricey. When you opt for a studio session, you’ll need to pay for the photographer’s time, expertise, equipment, and studio space. Rates can range from $150 to $500 per hour, so it’s a big investment.
- It’s time-consuming. Between the scheduling, hair and makeup, traveling, and actual shoot, a studio session can eat up a lot of time. Plus, you’ll have to wait weeks for the final results.
How to light a headshot for different effects
You don’t have to be a pro portrait photographer to use portrait lighting effects. By adjusting your lighting and camera settings, you can recreate popular studio photography techniques on your own.
- Butterfly lighting uses a light source centered above your head, pointing down at your face at a 45-degree angle to highlight the cheekbones. It’s popular for professional headshots because it softens skin texture and facial features to create a flattering look. If you don’t have a professional photography setup, you can mimic this technique using an elevated ring light.
- Clamshell lighting uses either two lights or one light and a reflector. The primary light sits above your face, while a softer light or reflector sits below to balance out harsh lines and shadows, creating a sophisticated, luxurious look. You can replicate this at home by using an elevated ring light above your face and placing either a softer lamp or a white sheet on a table below your face.
- Split lighting is a dramatic technique that places the light source opposite the subject so it only highlights one side of their face. So it’s generally not appropriate for professional headshots (unless you’re in a creative industry), but it’s fun for personal use.
DIY lighting setups for home headshots
Don’t want the hassle of an in-studio shoot? With the right equipment, a clean background, and some basic photography tips, you can create a setup that showcases you in the best light.
One-light setup with a reflector
This setup uses one light to illuminate the face, with a reflector tool to provide balance and eliminate shadows.
To DIY it, use a window or ring light as your primary light source and position the light above your face at an angle to highlight your facial features while limiting harsh lines. Just make sure you don't use direct overhead lighting, as this creates deep shadows on the face and can wash you out.
If you don’t have a reflector, try using a white sheet or white wall as a background instead. The white color bounces light back towards you, which helps soften the look of the photo and adds dimension to the shot.
Two-light setup on a budget
Using two soft, adjustable lights is an easy way to replicate professional techniques with desk or table lamps you probably already have at home.
Opt for lights with soft white bulbs and a slightly warm hue, rather than harsh blue light. Ideally, one light should be softer than the other. Place the lights slightly in front of you at a 45-degree angle to create balance.
A small diffuser will help disperse the light, but you can also place parchment paper over the light to act as a DIY diffuser. This creates a softer glow and minimizes harsh lines and shadows.
Golden hour hack
Golden hour is the time just after sunrise or just before sunset when outdoor light is very soft and flattering. This type of light produces a lovely golden hue that will give your face a natural warmth in headshots, no fancy equipment or backgrounds required.
To take advantage of this natural beauty, position yourself near a window in the early morning or late afternoon to take your headshot. You can also grab a friend or family member with a steady hand and head outside to take the picture.
Frequently asked questions
- What’s the best lighting setup for headshots?
The best headshot lighting setup uses a three-point system: a key light at a 45-degree angle for primary illumination, a fill light to soften shadows, and a backlight to add depth and separation from the background.
- How do I set up lighting for a professional headshot?
For a professional headshot, experiment with different angles, distances, and light modifiers to create an illusion of focused yet minimal lighting. You can replicate a professional lighting setup at home by pairing a key light with either a smaller, softer light or a white background. Avoid lighting your face head-on. Instead, place lights at 45-degree angles for a softer look.
- How do I achieve a good headshot lighting setup at home?
You can achieve a good headshot lighting setup at home using natural light and the right equipment. You’ll need a good camera, a ring light or other adjustable primary light, a soft secondary light, and a good background.
- What if I don’t have lights or reflectors at home?
If you don’t have lights or reflectors, you can still take a great headshot at home with some patience. Just find the window that gets the best natural light, and take your headshots in front of it during the early morning or late afternoon when the light is softest.
- What’s the easiest lighting setup for beginners?
A good lighting setup for beginners is to place a ring light or another adjustable primary light source slightly above your face at a 45-degree angle. Then use a white sheet or white wall behind you as a reflector. This will soften the light for a flattering headshot.
Are you ready to stun the crowd with the perfect headshot?
The whole goal of a professional headshot is to look amazing and make a great impression. While high-quality lighting is absolutely essential for a great headshot, we get it if you don’t want the hassle of adjusting lamps and double-checking shadows.
That’s where InstaHeadshots can help. With InstaHeadshots, you get the sleek lighting and polish you’d expect from a professional photoshoot, without the steep cost or the hassle.
InstaHeadshots’ AI headshot generator uses your real selfies to create realistic, professional headshots with flattering lighting and coordinating backgrounds, delivering hundreds of pro-level shots in just minutes.
Try InstaHeadshots today to bring your image to life!
InstaHeadshots has delivered over 4,392,249+ stunning headshots for 50,000+ professionals
We want you to know that you are in good hands. Our only promise is to leave you impressed with your headshots and come out happy on the other side.
Create your Headshots Now